Sunday 26 October 2014

High & Low key Lighting in the studio

High key lighting images are bright. They consist of light tones and whites. It also gets rid of harsh shadow.
high key photography tips
Low key lighting images are almost pure black with some tonal qualities where the light hits the subjects creating dramatic images. Unlike high key which gets rid of harsh shadows low key lighting relies on the shadow created by the light.
low key photography tutorial

Lighting equipment
  • Flash head
  • Snoot
  • Reflective Hood
  • Barn Doors

  • Light Stand

  • Soft Box

  • Diffusive Umbrella

  • Reflective Umbrella
  • Reflectors
  • Trigger and Receiver


  • Light Meter

  • Modelling Lamp
High key lighting
High key lighting set-up consists of 4 flash heads, 4 light stands but 2 is used on the white backdrop and 2 on the subject/subjects. Also needed is an of the accessory for each of the flash head (the preferred accessory is a soft box which gives shadows a blurred edge.) Then plug the receiver in to back of each flash head and the trigger on to top the camera. The camera also needs to be set up: ISO: 200 and a shutter speed of 1/60. Once the set-up is complete the light meter is the used to get the right f number on the camera, as the white sphere picks up how much light there is and the converts it in to what f number it is to produce the best picture. Then make sure every thing works like taking a picture.
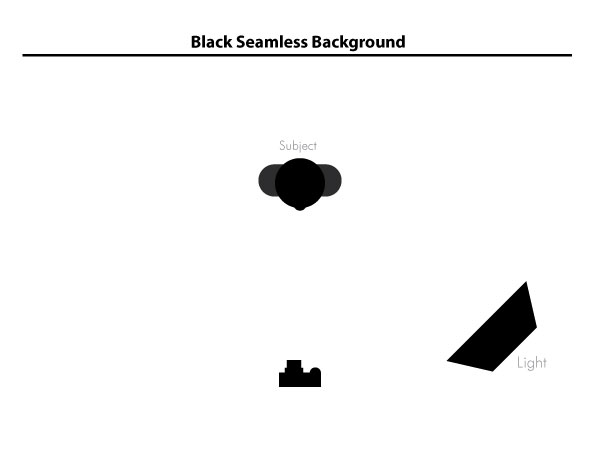
Low key lighting
High key lighting set-up only needs 1 or 2 flash head and light stand depending on if you want the background to be lit up a bit. Again a soft box can be used to soften the edge of the shadows unless the image would look better if the shadows are sharp. Also a reflector can be used to bounce some light back in. the rest is the same as the high key lighting.
This piece is created by Jennifer Morrison

Health and safety

  • After a few seconds the flash head heats up and becomes very hot so do not touch the bulb or flash head.
  • Do not look at the light while it is flashing.
  • Do not leave the wires from the light trailing as they can trip you up.

Friday 24 October 2014

Aperture & Depth of Field

Aperture is how much light passes through to an images which is determined by f numbers. The smaller the f number the more light passes through which means the focal point is sharp and crisp and around it is blurry (Low depth of field). The bigger the f number the less light that reaches the camera resulting in the whole image being sharp and crisp (High depth of field)

The f numbers are: F/1, F/1.4, F/2, F/2.8, F/4, F/5.6, F/8, F/11, F/16, F/22, F/32 ect...


Depth of field is the sharpest part of the image whether that is focusing on a small area due to a smaller f number or the whole area due to larger f number


The camera we used is a Nikon D3000 DSLR (Digital Single Lens Reflects) using the MASP settings: M stands for full manual mode which means that mean you manually enter the shutter speed and aperture and so on.
A is for aperture priority which is a semi-manual mode which mean that you have to pick the aperture, while the camera picks the best shutter speed.
S is for shutter priority which is a semi-manual mode which means you pick the shutter speed, while the camera picks the best aperture.
P is for program which is where the camera controls most of the functions apart from ISO.

First I had to set up the camera:
White balance: Auto
Image Quality: Fine
Image Type: JPEG
Aperture Priority
ISO: 400

and using the camera on aperture priority I took some photos with different f numbers.

f/5.3
f/8
f/16
f/32

In these experimental pieces the cars become sharper as the f number increases

Friday 3 October 2014

Sun Prints

Equipment
  • Objects: leaves, flowers, feathers, lace
  • Photographic paper
  • Card board
  • Glass
  • Tray


Method
  1. In a room with very little light place the objects on top of the photographic paper. Using a piece of card board underneath.
  2. Place the objects and the paper between glass and the card board. The glass holds the objects in place.
  3. Place it in direct sunlight for approximately 15-30 minutes or depending on how sunny it is. The more light there is the less time it takes.
  4. Take it back inside and remove the objects.
  5. Place in fix for 2-3 minutes.
  6. Remove from the fix then place in the wash for 3 minutes.
  7. Dry the print.

This piece is created by Jennifer Morrison
Health and safety

  • Be careful when using chemicals as they can cause irritation
  • Be careful in the dark room otherwise you can trip