Sunday 16 November 2014

Mod Roc and Plaster of Paris

Mod Roc
Mod roc is commonly used with broken bones which holds it in to place long enough for it to heal, but their is another use for mod roc like creating models which is created with modeling around wire netting, foil, newspaper etc or on a form such as a mannequin. It is also for making a cast of a hand, foot, face that then liquid latex can the be pored in.

Equipment and Materials


  • Mod Roc bandage
  • Scissors
  • Vaseline
  • Preferably warm water as then it will set quicker


Method
  1. First I cut up the mod roc bandage into strips and prepared the warm water.
  2. As I had chosen to do my foot I then had to take my shoe and sock off the roll up my trouser leg.
  3. Next, taking the mod roc piece I had already cut up I dipped it in to the warm water and placed it on to my foot then rubbed it until their where no holes left (I started at my ankle.)
  4. I worked my way down till I got to my toes then I worked my way back up again, I did this once more and again this time working my way down.
  5. As I was using my foot it was hard to look at my foot and tell if I had put enough on, so when I turned my foot I found out that I hadn't put any on and by this time it was nearly dry so working as quickly as I could I put some on that area.
  6. After it had full dried I then had to figure out a way to cut my foot out, I ended up using scissors being very careful not to cut myself.
Health and Safety
  • If the mod roc is being used on skin that  has long hair either use Vaseline or cling film as mod roc can pull on the hair and it really hurts (I found that out the hard way.)
  • If what is being made is small cut small strips to strat with or it will be tricky to use.
  • Modroc can dry the skin or cause irritation if in contact over a period of time use gloves when handling mod roc.


Plaster of Paris

Equipment and Materials

  • Clay
  • Plastic
  • Bowl
  • Water
  • Plaster of Paris
  • Objects to use also hands as an example

Method
  1. First I took some clay and rolled it out but making sure is was still quite thick.
  2. Next I took the palm of my hand and pressed it in to the leaving an impression of my hand I also used a watch.
  3. I then put a piece of plastic around my impression to stop the Plaster of Paris from going everywhere.
  4. I then mixed up the Plaster of Paris by first filling up a bowl with water then pouring in the Plaster of Paris until I had little mounds above the water. Then I mixed it with my hand.
  5. As it sets quickly I quickly poured it into the mould I then waited for it to dry which was about 10 to 15 minutes.
  6. I the pried it Plaster of Paris off the clay carefully as it was then going to be fired.
  7. So the mould was fired and then it was the glazed with white glaze and I then put glass in the fingers and the palm.
  8. I then painted the hand print first with inks the I went over it with a sharpie adding more detail like the thumb print. I also painted the watch and also added the detail the was on the back of the watch.


Health and safety
When mixing the Plaster of Paris do not leave your hand in the as when it sets it harden but not only that it also burn the skin so do wash off as soon as probably

Thursday 13 November 2014

Intaglio: Dry Point Printing

There are many types of intaglio printing techniques which is where an image is etched into the surface. The etched area holds the ink, but when the it is printed it is opposite of the relief print.

We created dry point print as unlike metal etching it does not require chemicals. One thing about dry point is that creates the burr effect which is material that is thrown up at the edge of an incised lines and then the ink is held in the grove and in the material that has been thrown up.

Arne Bendik Sjur
Arne Bendik Sjur is a Norwegian artist that depicts People and relationships. His focus for his work often explores struggling relationships, strong emotional expression of anxiety and life.

Equipment and Material
  • Perspex Plate
  • Etching Tool
  • Caligo printing inks
  • Scrim
  • Watercolour Paper
  • Printing Press

Method
  1. I first created a sample of mark making techniques. I used a sheet to help me get an idea of what mark making I could incorporate.
  2. Next after I felt comfortable I used an etching tool I created a portrait where I could vary the etching.
  3. I then used caligo ink and rubbed it over the surface then using scrim I work in a circular motion which ensures the ink is in the groves. Sometimes it is nice to leave excess ink on the surface but in this case I took away all of the excess ink.
  4. Then I layed the etching on to of a piece of damp water colour paper and ran it through the printing press and allowed it to dry.
  5. This is the first one I created using black ink and white paper but the I created other variations using different coloured inks, using two or more ink, different coloured paper,


    This print is just me printing with what was already on the plate.
    Also the image I used is one that I had drawn already I also created a video of me drawing the original: https://www.youtube.com/watch?v=Uzwqadjy0DI
Health and safety
  • Keep area clean and tidy
  • Keep area ventilated
  • Wear protective clothing
  • Use a cutting mat to a void the plate form moving when etching

Portrait photography


Taking a portrait on site and in the studio vary because the condition are different for example the lighting is provided, whereas the lighting in the studio is controlled but that can be very difficult.
The composition in both outdoors and studio portraiture should be the same which is the face centred and not much background showing. The point that should be the main point of focus and the sharpest is the eyes. If a photo is taken on location and the background has a lot going on then the back ground should be blurry which is a shallow depth of field.

This image was taken by Jennifer Morrison


Method
  1. First the low key lighting was set up but two lights where set up so that the light could be alter between the two creating a different effect.
    This image was taken by Jennifer Morrison
    This image was taken by Jennifer Morrison
  2. I then set up the camera: 1/60, f/8, 200 ISO, Manual Mode with manual focus
  3. Next I took photos of my model in different poses.

Wednesday 12 November 2014

Monoprinting

Monoprint is a form of print making. Monoprint means a one off print that cannot be reproduced. Their are four types of monoprints:

Additive
Equipment
  • Plastic board
  • Ink
  • Roller
  • Damp paper
  • Things to draw with: pen, cotton bud, cocktail stick, pencil, towel


Method
  1. I layed down some news paper to stop the table from getting wet and dirty.
  2. First I get a plastic board and with a roller I cover the surface with ink.
  3. Next either find an image from a secondary source or use a image that u have drawn.
  4. Lay down the paper over the ink the take the image and lay that on top of the paper.
  5. Then using a pen or something else, trace the image (using a Cotton bud gives a textured look whereas using a pointed object leaves lines) trying a range of different tools will give different textures and effects.
This piece was created by Jennifer Morrison


Reductive
The equipment is the same as the additive method apart from you also need a printing press.

Method
  1. I again layed down some news paper to stop the table from getting wet and dirty.
  2. Again get a plastic board and cover it in ink with the roller.
  3. This time use a tool to take away ink from the board.
  4. Then lay it onto a printing press with paper on top.
  5. Put it through the roller and take it out the image will have transferred on to the paper and if there is any ink left it can be put through the rollers again with different results.
This piece was created by Jennifer Morrison

Stencil
Equipment
  • A2 paper
  • Cutting mat
  • Craft Knife
  • Plastic board
  • Ink
  • Roller
  • Damp paper
  • Things to draw with: pen, cotton bud, cocktail stick, pencil, towel
Method
1. First I drew out some shapes on the A2 paper making that it was the opposite side. Then using a craft knife I cut out the shapes.
2. I then inked up the board with the roller and then layed the stencil on to the the piece that I previously had prepared.
3. Then rolled it through the print press. Then rolled it with a piece of inked up mesh.


4. Then with the board still inked up I put a piece of paper on it the rolled it through the press again creating a ghost print.


5. I then inked the board with blue and on top of the ghost print and then with the board created another ghost print.


Painterly Method
Equipment
  • Plastic Board
  • Ink
  • Paint Palette
  • Paint Brush
Method
  1. First I made some marks on the plastic board so that when I wanted to place the paper back on top it would line-up perfectly.
  2. I put some ink in the paint palette then with a brush I stared to paint the first layer on to the plastic board then rolled it through the printing press.
  3. Then with the board still inked up I then applied the next layer and kept going until I was finished.

Low Relief Clay Tiles & 3D ceramic

Low Relief clay tiles
A low relief clay tile is a tile that is not a 3D form but has been carved on to.

Equipment and material

  • Paper
  • Scissors
  • Clay
  • Rolling pin
  • Fork
  • Carving knife
  • Coloured slip
  • Glaze


Method
1. First I made a collage to use as a basis for my low relief clay tile.


2. I then rolled a slab and used the collage as a template carving in to the slab then adding pattern.


3. Next I cut them into three separate sections so that when arranged into a different order as it would give a different result.


4. I also applied a decorating slip that has added colour.Then it was bisque fired.


3D clay ceramics
3D clay ceramics can be a bowl or mug that has added carvings, but it can also have no purpose and just be an ornament.

Equipment
  • Clay
  • Rolling pin
  • Fork
  • Carving knife
  • Coloured slurry
  • Glaze

Method

1. I rolled out the clay till even thickness then used the jigsaw as a template to cut out the shapes.
2. Once the clay has become leather-hard I then arranged them.


3. I added blue coloured slip.
4. It was then bisque fired. Then I added under-glaze.


5. Glaze was then added and glass.


6. It was then fired.


Health & safety
  • Keep the area clean and dust free, as it can cause long term problems.
  • Be careful when using glass and use a piece of paper underneath to the put the leftover glass back.

Adobe Illustrator

First I opened up a new document on adobe illustrator making sure it is A4 and landscape


Then I chose one of Kandinsky's works as there is loads of circles and line and colour, but also I am trying to recreate his work using illustrator.


Using the pen tool I then drew the lines.


Hiding the layer with the lines I the drew the circles using the circle tool.  


I then made the lines thicker.


I then added colour and added two more circles around the image like in Kandinsky's work.


I then used more colour but this time on one of the circle I made the colour slightly transparent.


Changing a Photo on Photoshop

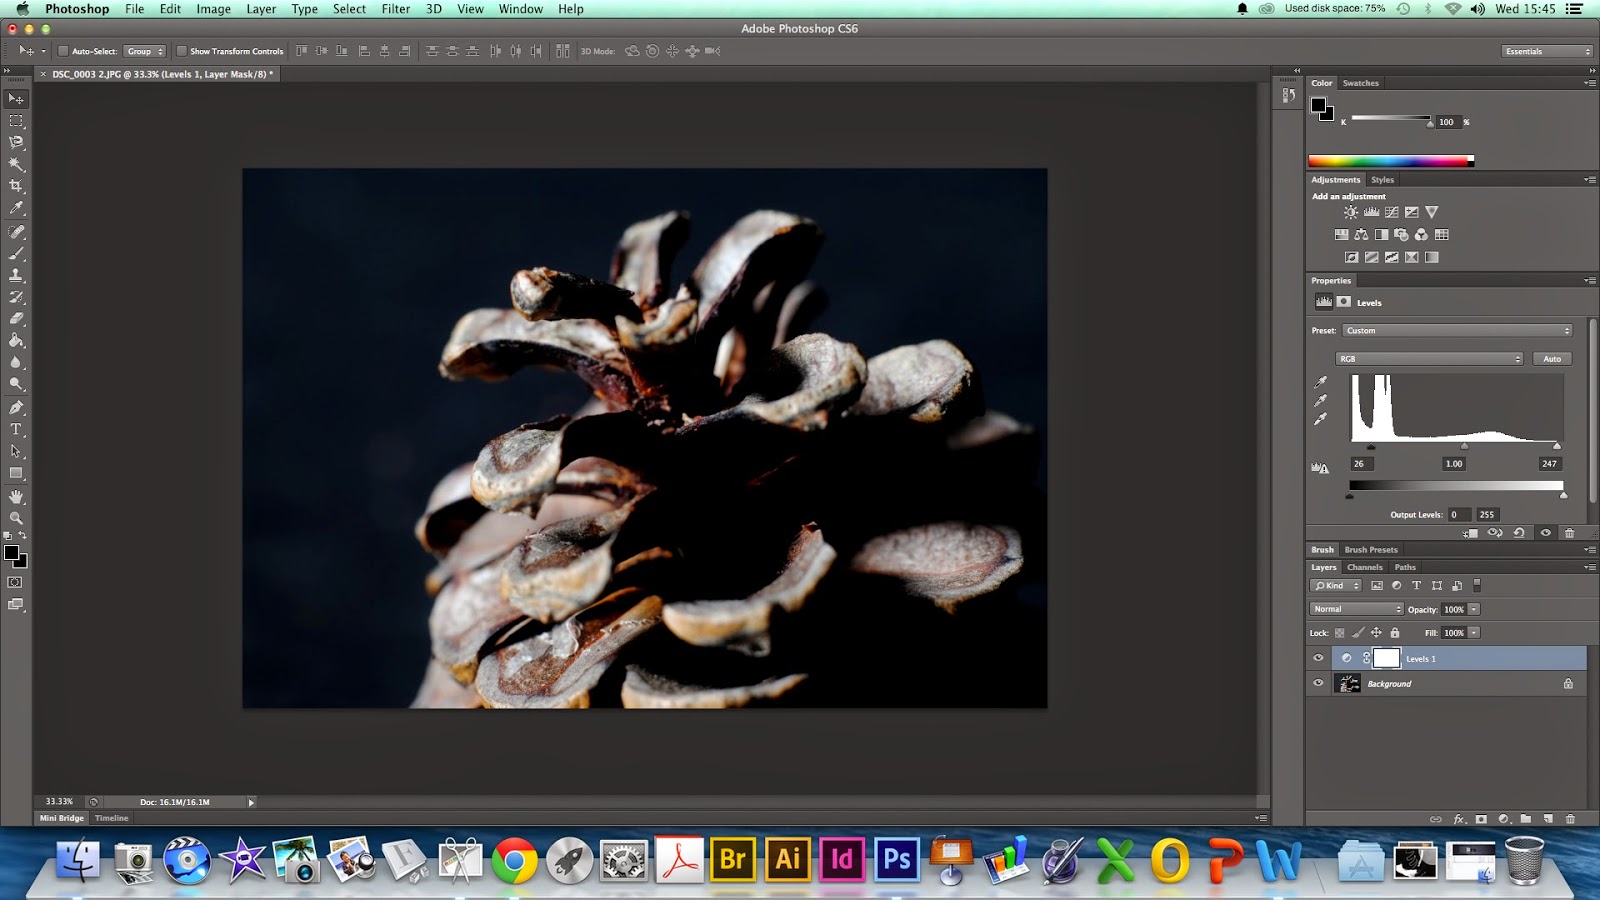
I took a close-up photo of a pine cone in low key lighting and to make the pine cone stand out so I changed the image to be more dark in some places and the object to be light.

First I opened up the image on Photoshop.


 Next I picked levels to make the background darker.


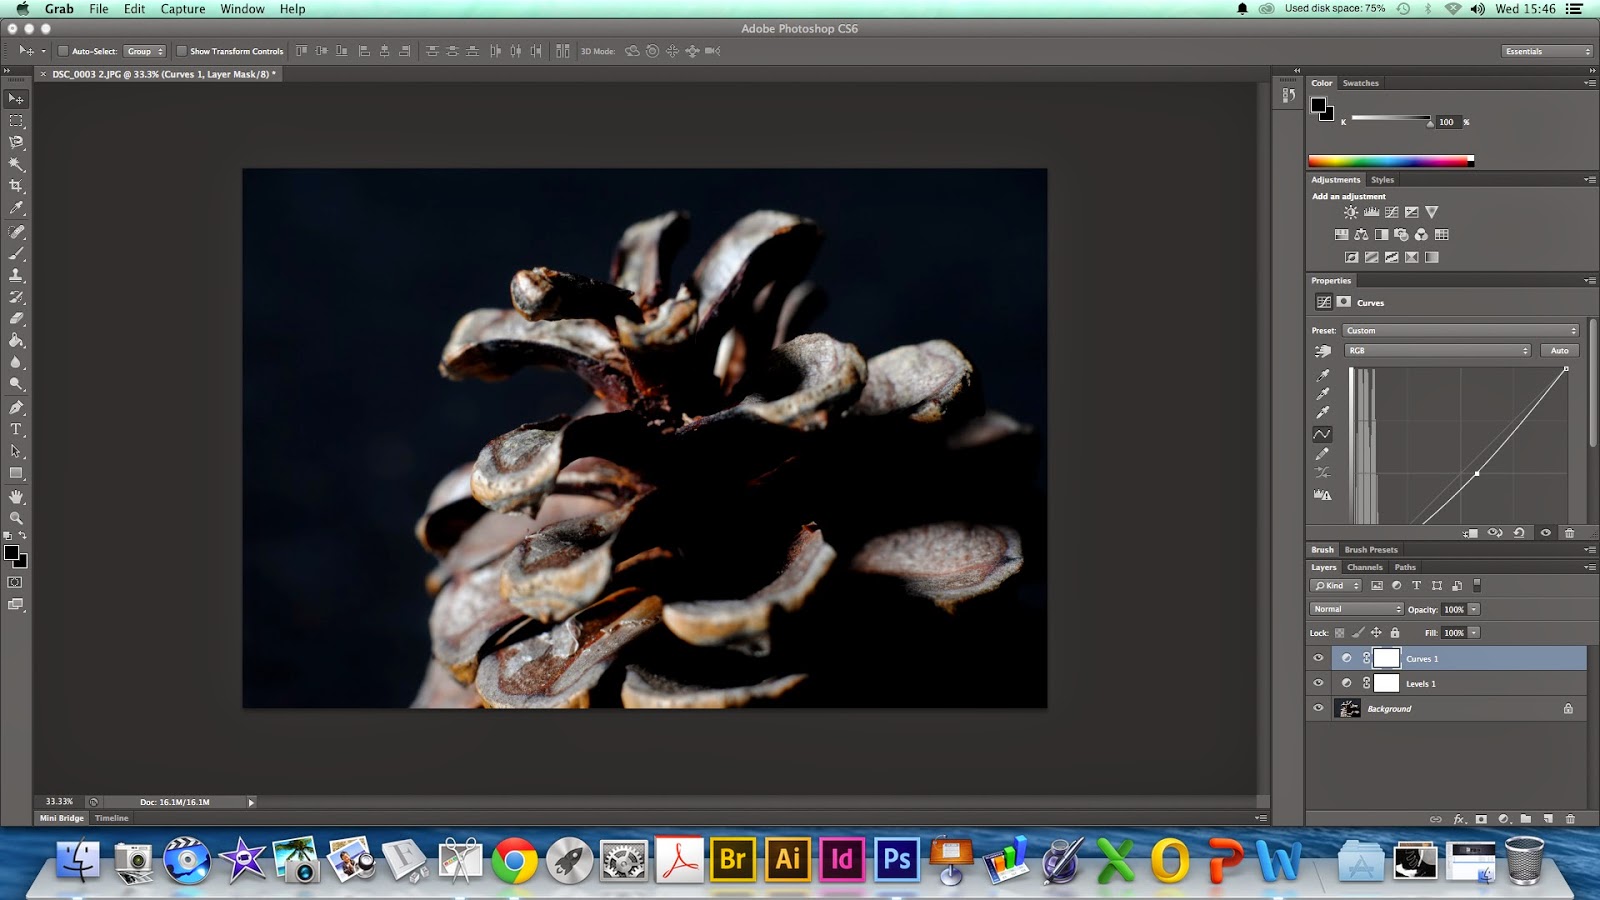
Then to make the background darker I then used curves, but it made the object darker as well.


So I used exposure to make the pine cone stand out.


And brightness/contrast to make the blacks blacker and the whites whiter.


I then changed the image to black and white as it makes the image more dramatic.